
Anodising technology • Energy systems
Microelectronics • System software
Microelectronics • System software
 Anodising guide 5. Work steps

")
Anodising guide - 5. Work steps |


|
The following is the description of the necessary steps in order to get a successful anodisation. If you follow these instructions, you should get very nice pieces, in nothing inferior a professional production.

Nitric acid and sodium hydroxide are extremely corrosive substances. Avoid all skin and eye contact! Wear
protection googles, acid-proofed gloves and robust clothing. Also, remember that strong
nitric acid has an oxidising effect. There is auto-ignition hazard particular in contact with organic materials
(e.g. cotton)!
In case of eye contact flush them immediately under running water and seek medical attention immediately. Else you take the risk of blindness!
Depending on the desired surface of the workpiece is pretreated mechanically (for example: grinding, brushing, polishing). Please note that the subsequent anodization does not forgive surface defects - in contrary, these are frequently more obvious after anodising. Take care of the preparations - you will avoid later trouble caused of a constantly visible scratch or even a complete repetition of the entire procedure.
All impurities (including fingerprints) on the surface deteriorate or prevent the formation of the anodisation layer at this area. That is why it is important to also clean the workpiece thoroughly chemically. Cleaning can be done, for example, with sodium hydroxide solution (which also leads to a slightly etched surface). However, it is better to use special cleaning agents which have been specially developed for this purpose.
After cleaning, you may not touch the workpiece anymore! Dip it now in the bath with tap water to remove the remains of the detergent by extensive flushing. Depending on the size and complexity of the workpiece, it is sufficient to keep it under plenty of running water first.
Notes:
A brief immersion of the part in nitric acid at this stage facilitates the formation of a
more beautiful anodised layer but, in our opinion, it is worth the extra effort only in exceptional cases. So
we will not go into details here.
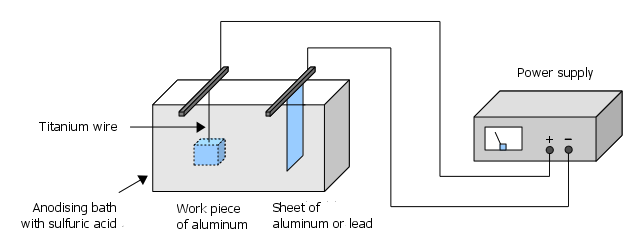
This is the most important step. The following graphic shows the basic structure of an anodising bath:
The anodising itself occurs in 15-20% sulfuric acid. The exact concentration is not critical. If you buy normal battery acid (about 37% H2SO4) you can produce the correct concentration easily by mixing with distilled water in 1:1 ratio. Here and in particular during dilution of highly concentrated acid please note the following:
Never pour the distilled water directly into the sulfuric acid - always choose the other way: Stir the sulfuric acid slowly into the (preferably cold) distilled water. Because the mixture heats up during dilution, it will spray otherwise!
Of course also here: Be sure to wear goggles, gloves and old clothes!
Once the solution is produced, it easily can be used over a long period of time e.g. by storing in canisters. Do not forget to mark the containers clearly and to never use drink containers (bottles, etc.) for storing!
Later you can measure the concentration of the acid easily, for example with so-called hydrometers. The dept of immersion of the hydrometer shows the density of the acid. With this information calculation of the concentration is easy.
All surfaces of the workpiece to be anodised must immerse into the acid bath, as only the exposed surfaces can form the anodised layer. This can be most easily achieved by titanium wire, which e.g. is inserted into an existing hole in the workpiece. As the current also flows through the wire, the clamping has to be strong. It is not enough to thread the pieces like pearls on a string. However, often it is enough to wrap the wire tightly some times around the workpiece or clamping it "V"-shaped in a hole. Also it is important to use only acid-resistant aluminum alloy or equivalent conductors (pure titanium is ideal) for the support - other metals are not suitable (Keyword: electrochemical series of metals) and will be destroyed!
Our piece gives the anode - so here we connect the positive (usually red) terminal of our power source. The cathode is our aluminum/lead sheet and we combine this with the negative (usually black) terminal.
The thickness is determined mainly by varying the anodising duration and the current, so it is dependent upon the amount of electric charge that has been flown. As a rough guide for the current to be set we recommend
1,5 A per 100 cm² of surface
with a duration of 60 minutes (= 3600 seconds) and a bath temperature of +20°C.
For a better understanding see the follwing small example:
Our piece is an aluminum cube with a side length of 10cm. Our power source delivers a maximum of 6 amps. The total area of the cube (= six sides) results in:
10cm * 10cm * 6 = 600 cm²
With the above benchmark the power should source a current of
600 cm² / 100 cm² * 1,5 A = 9 A
for 60 minutes. As our power supply can only source 6 A we have to increase the anodising duration accordingly:
9 A / 6 A * 3600s = 5400s
what is equal to 1,5 hours. The motto here is: Better slightly longer than too short. Now we dip our cube into the bath for 90 minutes at 6 amps.
Of course these values are only approximate guidelines, because exact currents depend on the used alloy and the geometry of the parts. Important is that we calculate the current with all surfaces which are in contact with the acid.
While the thickness of the anodized layer increases their electrical resistance and current flow decreases (even at the beginning). This can be corrected by hand by increasing the voltage or by using a current-compensated power supply which provides the desired current regardless of layer resistance.
As time goes by a matt surface builds up and the gloss disappears. At the cathode you can see the ascend of a fine nebula of bubbles of hydrogen. This is normal and shows that the electrochemical reaction continues.
In order to estimate the duration of an unknown alloy, you should first test with a rest piece. Dip this deeper and deeper after short intervals (e.g. 2cm after 10 minutes) into the bath. So this pieces create a series of tests, from which you can later easily determine the optimum time for bath duration (You can use the same procedure when dyeing: this is useful to produce a time/saturation test piece).
Hydrogen is flammable and can form explosive mixtures with air oxygen. Although very little hydrogen is created, you should therefore avoid any open fire close to the anodising bath and ensure good ventilation!
Before dyeing, the workpiece must be flushed thoroughly under normal and then distilled water - in addition, when dyeing complex parts, the remaining sulfuric acid should be removed by watering several minutes in a distilled water bath.
Now dip the washed piece into the warm dye bath (about 50 degrees Celsius) and move it from time to time to accelerate the migrating of the dye. Remember also this fact: due to possible fingerprints do not affect its anodised surfaces - it's best to handle it only at the titanium wire.
The concentration of the dye bath depends on the dye and the desired color saturation. Depending on color intensity and concentration of the bath duration for dyeing is 2-20 minutes. In determining the duration for a certain color saturation the above-described method of a test series for layer thickness helps, too. This time, of course, a uniformly anodized workpiece has to be used, which is freshly anodised. The longer the workpieces stay in the dye bath, the more intense the color. This allows to create light to dark saturations of one color very easy.
Certain colors can also be mixed or used consecutive. Due to chemical properties the dye molecules are deposited on to different parts of the pores and produce a mixed color tone.
You don't have to colorize the layer, of course. If you only need the simple "aluminum look", you immediately can move to the sealing. This produces a silver-matte appearance, as usually have aluminum profiles, for example, which are sold meter by meter in hardware stores.
This is the essential process to produce a tough and durable anodised surface - and relatively simple. The workpiece is simply for about 60 minutes dipped in boiling (not just hot!) water. This will close the pores of the surface and the intermediate chemical form is moved into the final form, which is responsible for the extreme hardness of the layer. We also recommend distilled water for this (and our special sealing additives for perfect results) as normal tap water can cause calcium deposits.